How to Script and Format a Split Screen AI Presenter Video
By Alex Stevens
Why AI Avatar Channels Are Winning on YouTube Right Now
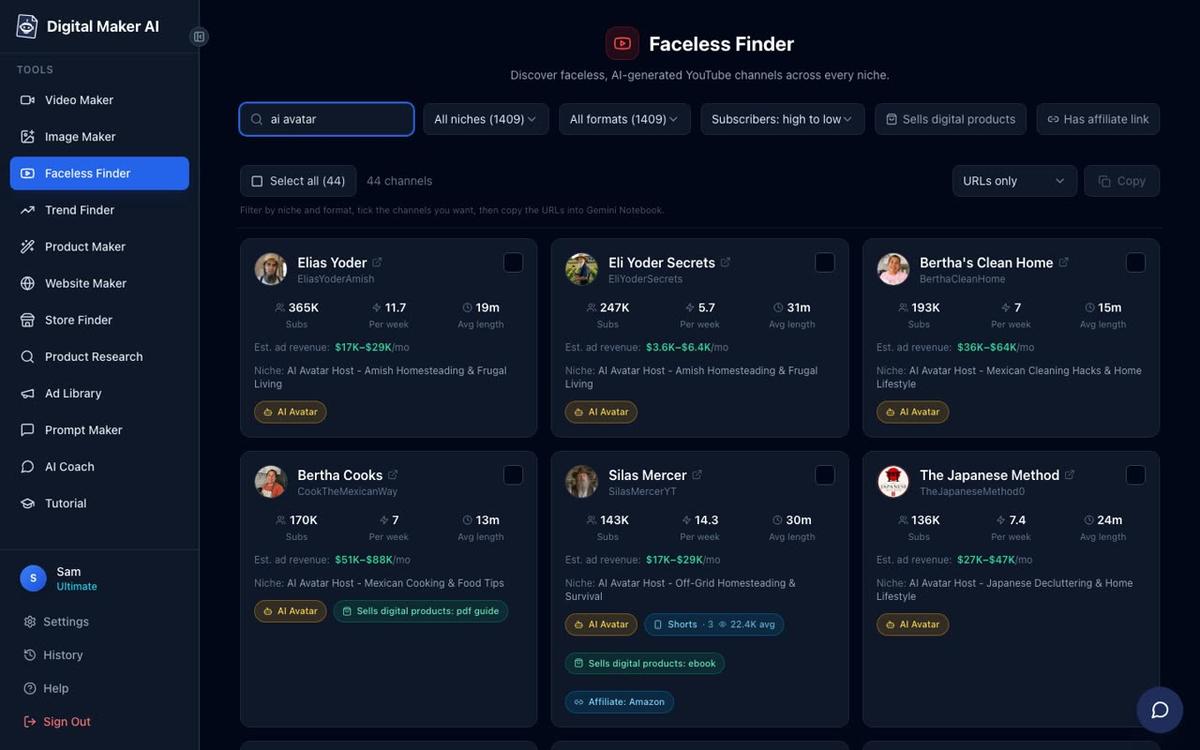
The split screen AI presenter video format is quietly powering some of YouTube's fastest-growing channels, and none of them put a real person on camera. Take a look at what the Faceless Finder inside Digital Maker AI surfaces when you search "AI avatar": every result is a channel built around a fictional host with a strong persona, a tight niche and a relentless upload schedule. The figures below are Digital Maker AI Faceless Finder estimates, not the channels' real earnings, but they give a clear picture of the opportunity.
Elias Yoder has grown to 367,000 subscribers in the Amish homesteading niche, with the Finder estimating around 1.5 million views a month and ad revenue of $10,000 to $16,000 a month. Bertha Cooks sits at 189,000 subscribers with an estimated 4.5 million monthly views and $28,000 to $42,000 in estimated monthly ad revenue. The Japanese Method and Silas Mercer both sit at 145,000 subscribers, with The Japanese Method estimated at $28,000 to $43,000 a month and Silas Mercer at $14,000 to $21,000 a month. Bertha's Garden Hacks has reached 136,000 subscribers with an estimated 4.1 million monthly views.
What these channels share is a formula: an AI-generated host with a memorable persona (an elderly Amish farmer, a Mexican grandmother, a Japanese decluttering monk), practical tips in a tight niche, and daily uploads. The host appears on screen alongside relevant scene imagery, which is exactly what the split screen format is built for. No real person, no studio, no camera crew.
How to Write a Script for a Split Screen AI Presenter Video
The biggest scripting mistake new creators make is writing every line as if the presenter will be on screen for all of it. In a split screen AI presenter video, the presenter shares the frame with a scene image, so your script needs to do two jobs at once: give the presenter something meaningful to say, and signal when the scene should carry the story instead.
Think of your script in three types of moment:
- Presenter-led moments. These are lines where the host's face and delivery matter most: the opening hook, a personal anecdote, a strong opinion, a call to action, or a summary at the end. Write these in a conversational, direct tone. Short sentences. Eye contact energy. These are the scenes where you will place a presenter marker.
- Scene-led moments. These are lines that describe something visual: a technique, a tool, a location, a before-and-after. The scene image carries the visual weight here, and the presenter's voice narrates over it. You can still show the presenter in a corner circle layout during these moments, but the scene does the heavy lifting.
- Transition lines. One or two sentences that bridge sections. These work well in full screen layout, with the presenter speaking directly to the viewer before the next scene takes over.
A practical rule: if a line contains a visual noun (a raised bed, a cast iron pan, a solar panel), it belongs in a scene-led moment. If it contains an emotion or a direct address ("here is what most people get wrong"), it belongs in a presenter-led moment. Mark these in your script before you build the video, because they will map directly onto the presenter markers and layout choices in the next steps.
Choosing Between Full Screen, Split Screen and Corner Circle Layouts
Digital Maker AI's AI presenter feature offers three layouts, and you can tick more than one so the video rotates through them. Each serves a different purpose.
Full screen puts the presenter front and centre, filling the entire frame. Use it for the opening hook, for emotional beats, and for calls to action. It commands attention and works best when what the presenter is saying matters more than what the viewer is looking at. It is also the strongest layout for building a sense of character and trust with a new audience.
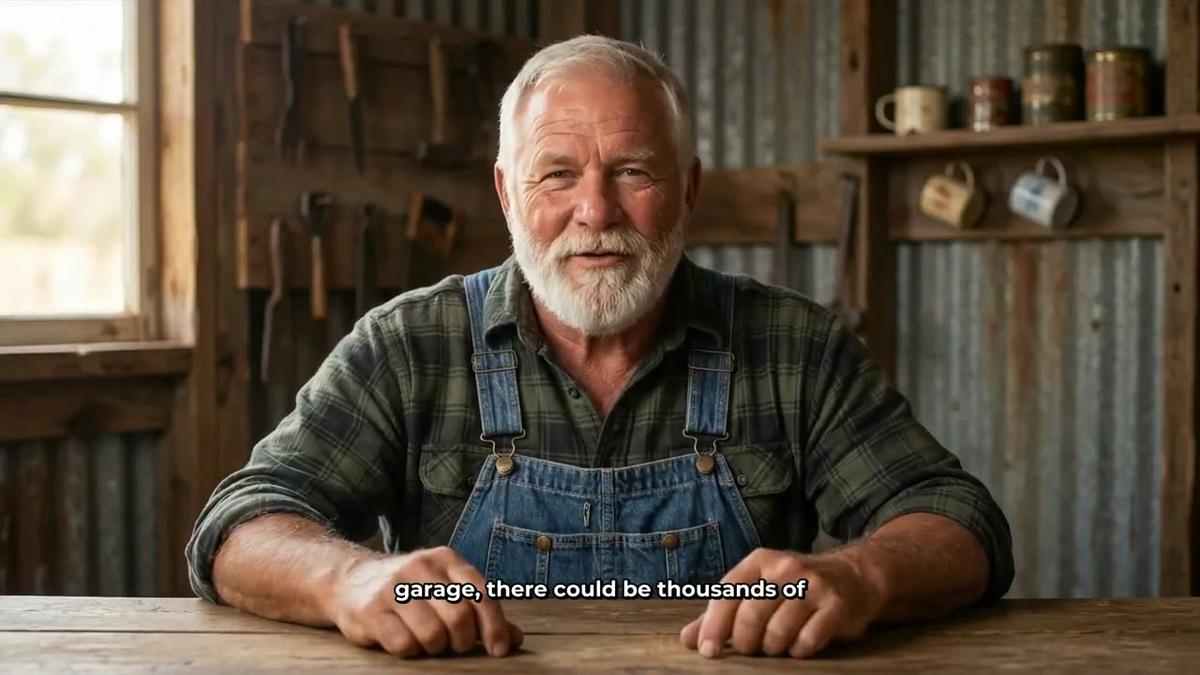
Split screen places the presenter on the left half of the frame and the scene image on the right. This is the signature layout of the channels above: the viewer gets the human connection of a talking host and the visual context of the scene at the same time. It works especially well for how-to content, tip lists and any video where you want the audience to associate the host with the subject matter. It is the most versatile layout for a split screen AI presenter video and a strong default for the middle sections of any video.

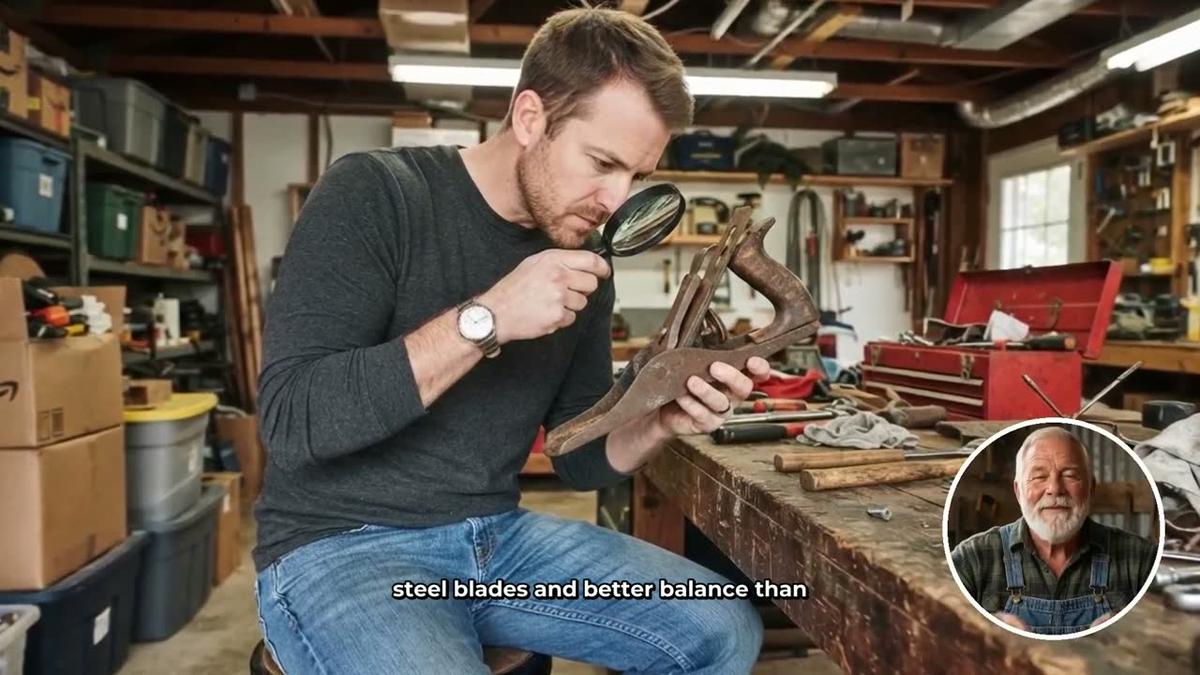
Corner circle keeps the scene full screen and places the presenter in a small round window in the corner. This is the least intrusive layout and works well for the descriptive, scene-led moments in your script: the viewer's attention stays on the imagery while the presenter remains present as a familiar face. It is also a smart choice for longer videos where full screen or split screen for every scene would feel repetitive.
A strong pattern for a five to ten minute video is: full screen for the opening hook, split screen through the main tips, corner circle for the detailed step-by-step moments, and full screen again for the closing call to action. Tick all three layouts and let the presenter markers control where each appears.
Setting the Screen-Time Slider and Placing Presenter Markers
The screen-time slider controls how much of the total video the presenter is actually on screen, from as little as 5 percent up to the full video. For most how-to channels, a setting somewhere between 30 and 60 percent works well: enough presenter time to build the host's personality, but enough scene time to keep the visuals varied and the content grounded.
The marker system is where retention strategy comes in. You place markers on a timeline bar to tell the video exactly where the presenter should appear. Three placements consistently support watch time:
- Start marker. Always place a presenter marker at the very beginning. The first 30 seconds decide whether a viewer stays or leaves. A recognisable host face in full screen is one of the strongest retention signals you have.
- Mid-video marker. Place a marker roughly halfway through to re-engage viewers who are drifting. A quick return to the presenter's face, even for 15 to 20 seconds, resets attention. This is where a line like "and here is the part most people skip" lands perfectly.
- End marker. A closing presenter moment for the call to action: subscribe, try the tip, leave a comment. Ending on the presenter's face rather than a static scene image leaves a stronger impression and reinforces the channel's identity.
Between the markers, the video plays through the normal scene images, with the presenter appearing in corner circle if you have that layout ticked. This gives you a video that feels host-led without exhausting your avatar time budget.
Step-by-Step: Create Your AI Presenter in Account Settings
AI Presenters are available on Premium and Ultimate plans. Once you are signed in, open Account Settings and click the Presenters tab. You will see a form asking you to describe who your presenter is and their setting. Write one or two sentences: their age and look, what they are wearing, and where they are sitting or standing. The more specific you are, the more consistent the result. Quick-pick options like "Retired grandfather", "Amish gardener" and "Stoic philosopher" are there if you want a starting point.
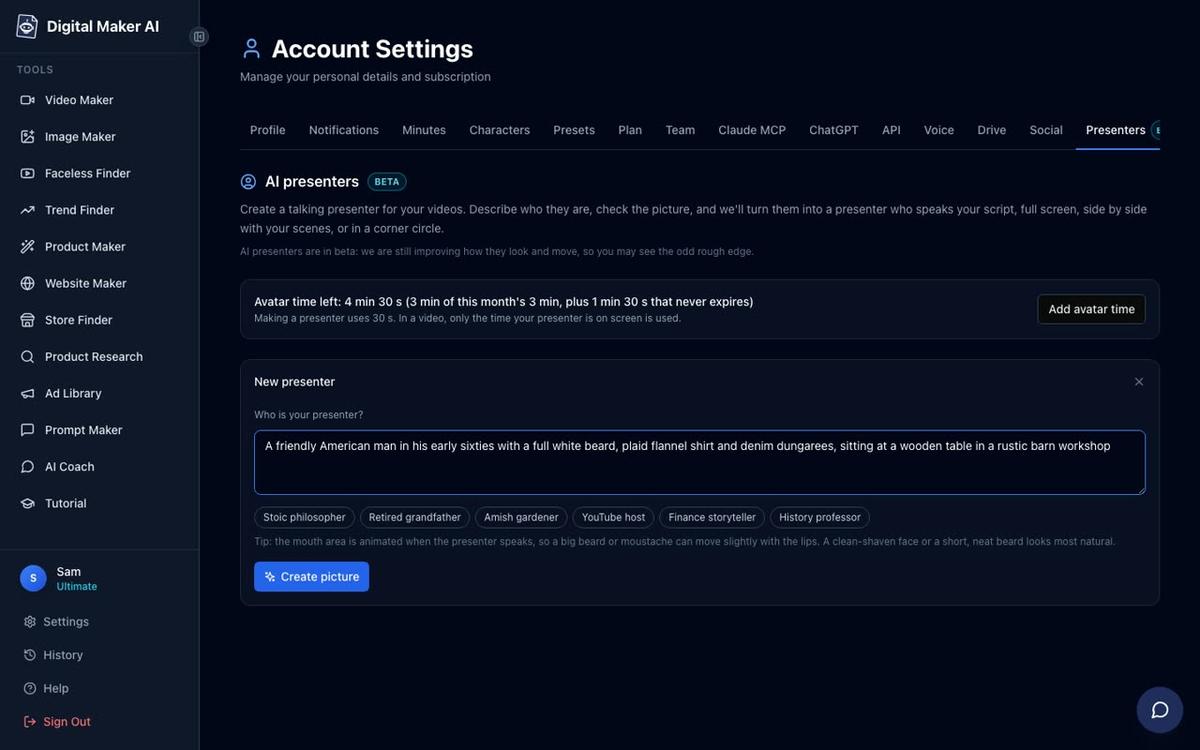
Press Create picture and the AI generates a photoreal image of your presenter. Check the result: does the face, setting and style match the persona you want for your channel? If it does, save it. If not, adjust the description and try again. Creating a presenter costs 30 seconds of avatar time. You can save several presenters and reuse them across different videos, which is how channels like those above build a consistent on-screen identity across hundreds of uploads.
A short note on avatar time: it is counted in seconds and is separate from your video minutes. Premium plans start with 2 minutes of avatar time and Ultimate with 5 minutes, with Ultimate also receiving 3 minutes every month. The video only uses the seconds the presenter is actually on screen, so a 10-minute video with the presenter at 40 percent screen time uses roughly 4 minutes of avatar time. Avatar Packs let you add more as a one-off purchase. See digitalmaker.ai/pricing for current pack options.
Building the Video: Picking Layouts in the Multi Scene Maker
With your presenter saved, go to the Video Maker and start a new Long-Form Faceless Video. At step 1, choose Multi Scene. Work through the steps: add your topic, pick your visual style, set your length and choose your narration voice. The presenter options appear as part of the video setup. Select your saved presenter, then tick the layouts you want to use: Full screen, Split screen, Corner circle, or any combination.
Set the screen-time slider to your chosen percentage, then place your presenter markers on the timeline bar at the start, middle and end positions described above. The rest of the setup continues as normal: pick your captions style, set the pacing, and check the review screen before generating.
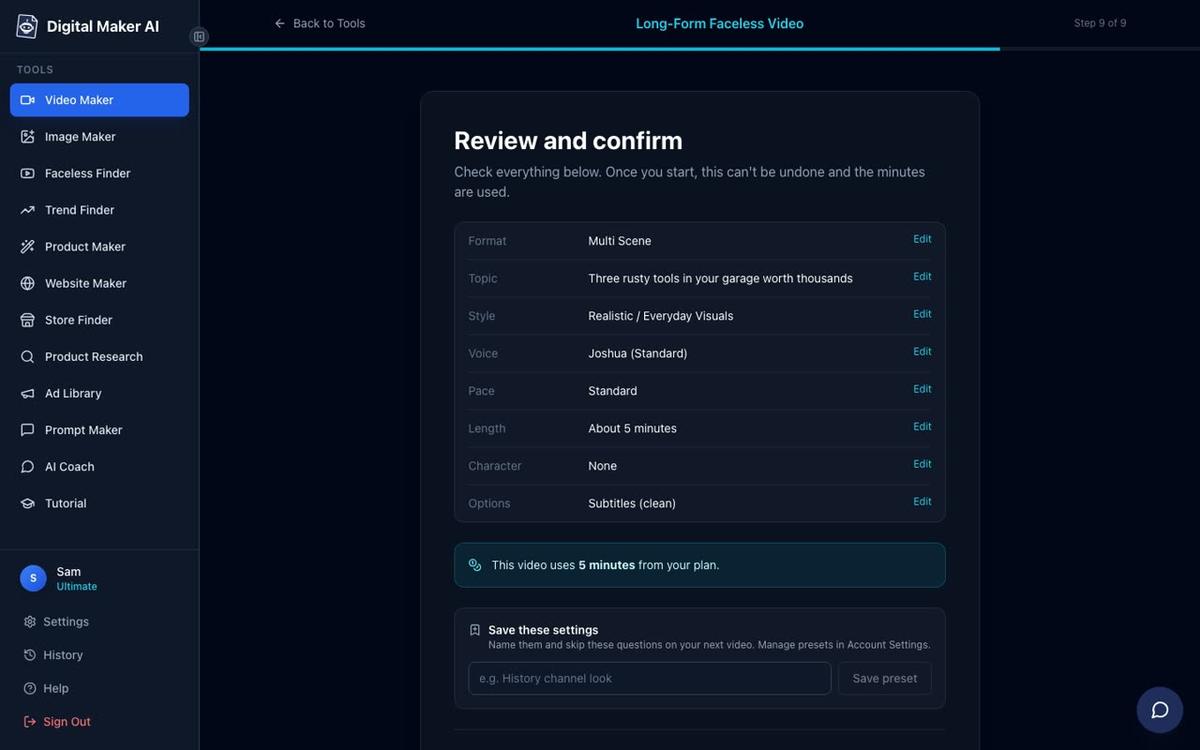
The platform writes the script, generates a scene image for every scene, records the narration in your chosen voice, adds captions and renders the presenter into the chosen layouts at the marked positions. The result is a complete MP4 ready to upload. You can also read more about the full range of AI avatar video options on the Digital Maker AI site.
Practical Tips for a Stronger Split Screen AI Presenter Video
A few things that make a measurable difference once the format is set:
- Match the presenter's setting to the niche. A presenter sitting in a barn workshop feels right for a homesteading channel. A presenter in a temple garden fits a Japanese lifestyle channel. The setting is part of the persona and it should reinforce the topic of every video.
- Keep the opening hook under 30 seconds. Start with full screen and a direct statement of the video's value: "Most people store their seeds wrong. Here is what actually keeps them viable for five years." Then cut to split screen as you go into the content.
- Use the presenter's voice consistently. The AI presenter speaks with the same narration voice as the rest of the video. Choose a voice that fits the persona: a calm, measured voice for a mindfulness channel, a warm and conversational one for a cooking channel. Keep the same voice across every video on the channel.
- Build a library of presenters. You can save multiple presenters in Account Settings. Some creators run two or three personas across different channels from the same account, each with its own look, setting and niche.
- Regenerate scenes that clash with the presenter. After the video is made, you can regenerate any scene image that does not sit well next to the presenter in split screen. Ten free regenerations come with every video.
If you are looking for niche ideas to pair with a specific presenter persona, the posts on AI avatar channel ideas for Amish homesteading videos and AI avatar channel ideas for off-grid and survival videos on the Digital Maker AI blog are worth a read.
Getting Started with AI Presenters
The channels at the top of this article did not get there by accident. They picked a persona their audience could connect with, a niche narrow enough to own, and a format (the split screen AI presenter video) that keeps viewers watching longer than a plain voiceover video. The format works because it combines the trust signal of a human face with the visual variety of scene imagery, and it does it without a camera, a studio or a real person in front of a lens.
Digital Maker AI's AI Presenters feature is available on Premium and Ultimate plans. The Free plan lets you try the long-form video maker without a card, so you can see how the Multi Scene format works before you add a presenter. When you are ready to add a host to your channel, the free course at digitalmaker.ai walks through the full workflow from channel idea to finished video, including how to script and format your first presenter video.
Alex Stevens: Alex Stevens writes for the Digital Maker AI team about faceless YouTube channels, AI presenters and AI video tools.